Video Overlay Editor: Timeline, Timing, and Animated Branding
Control exactly when logos, text, and CTAs appear in your videos with the timeline editor — and learn how it differs from the image editor.
The video overlay editor does everything the image editor does — text, logos, shapes — and adds the dimension that matters for video: time. Every element is a clip on a timeline, so your logo can persist throughout while the CTA drops in for the final seconds. Open it from the Overlay Library via Create Preset → Video Preset.
The editor at a glance
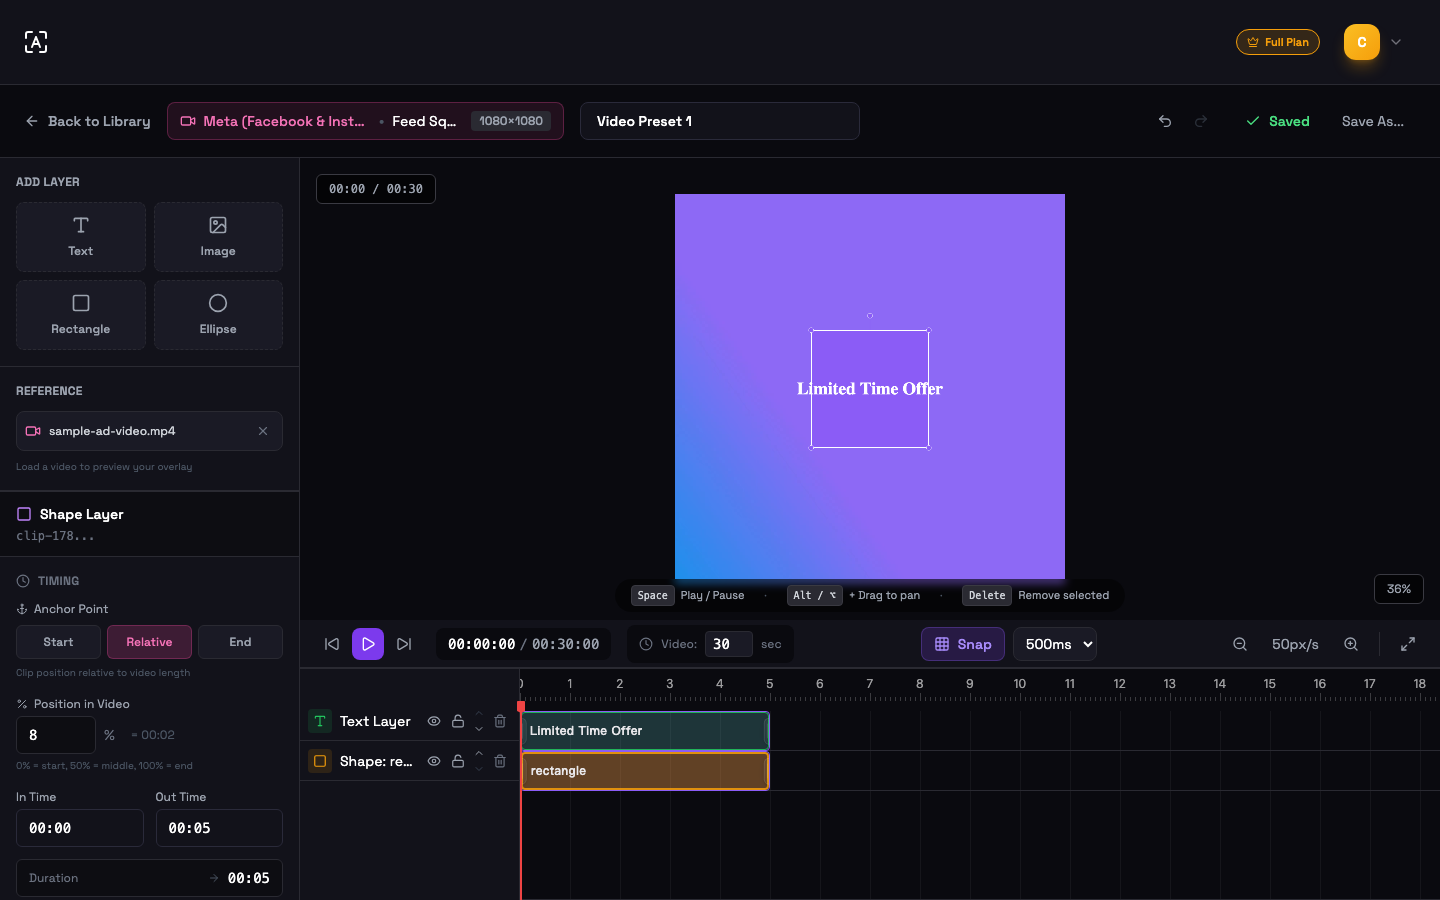
- Add Layer — Text, Image, Rectangle, Ellipse. Each new element becomes a clip on its own track, starting at the playhead with a 5-second default duration.
- Reference video — load a video behind the canvas to design in context (preview-only, never exported).
- Timeline — one row per clip with drag-to-retime, a red playhead, and per-track controls (show/hide, lock, rename, reorder, delete).
- Autosave & Save As — same behavior as the image editor.
The timeline
- Play/pause with Space, or use the skip-to-start/end buttons. The readout shows minutes:seconds:frames.
- Drag a clip to move it in time; drag its edges to change in/out.
- Snap — toggleable grid from 0.1 s to 5 s (default 0.5 s) keeps clip edges aligned.
- Video length — set the design-time preview length (5–300 s).
- Timeline zoom — 30–200 px/s, with fit-to-view.
- Ghosting — clips outside the playhead's current time render at 30% opacity on the canvas, so you always know what is visible right now.
- Track locks — locked tracks can't be moved or edited; hidden tracks disappear from the canvas.
Anchor timing: presets that survive any video length
Videos in a batch rarely have the same duration, so absolute timestamps aren't enough. Each clip has an Anchor Point that decides how its timing adapts:
| Anchor | Behavior | Typical use |
|---|---|---|
| Start | Clip starts at the beginning of the video | Logo bug, opening title |
| Relative | Clip sits at a percentage of the video (0% = start, 50% = middle, 100% = end) | Mid-roll message that scales with length |
| End | Clip holds its offset from the end of the video | CTA and end-card that always close the spot |
The TIMING panel also exposes exact In Time / Out Time (MM:SS) and the resulting duration, with a mini-timeline visualizing where the clip sits.
Clip properties
Per-clip controls mirror the image editor with a few video-specific differences:
- Text clips — font (incl. your uploaded fonts), size 12–200, styles, alignment, color, text opacity, shadow, and the same Text Box group (fill, border 1–10 px, shadow, padding, radius) for CTA-style badges.
- Image clips — replace, crop, aspect-lock, and a master opacity slider for watermarks.
- Shape clips — fill + opacity, border (1–20 px) + opacity, corner radius, and 0–50 px edge blur, e.g. for a soft scrim behind captions.
- Dimensions & position — pixel inputs with aspect-ratio lock; values adapt cleanly when the preset is applied to other formats.
How it differs from the image editor
| Image editor | Video editor | |
|---|---|---|
| Data model | Static layers | Clips on a timeline, one track per clip |
| Timing | — | In/out times + Start / Relative / End anchors |
| Playback | — | Space play/pause, playhead, ghosting |
| Grouping | Cmd/Ctrl+G persistent groups | Multi-select only (shift-click / marquee) |
| Arrow keys | Always nudge selected layers | Nudge playhead when nothing is selected, otherwise nudge clips |
| Layer list | Layers panel (right) | Timeline tracks (bottom), with lock & visibility per track |
| Export | Composited in the browser | Baked in during cloud processing |
Applying to your videos
In the preview step, video formats show a Video Overlays panel — apply a matching preset or design one on the spot, per file and per format. During cloud processing every clip is rendered at full resolution and composited into the exported video, respecting its anchor timing against that video's real duration.
Common questions
Server-side, during cloud processing. Each clip is rendered at full resolution and composited into the video for every exported format, so the result is identical across players and platforms.
That is what anchor timing is for. A clip anchored to Start always begins at 0:00; anchored to End it holds its offset from the end; anchored Relative it sits at the same percentage of any video. A preset designed once adapts to 6-second bumpers and 60-second spots alike.
Clips fade to 30% opacity when the playhead is outside their time range — that is the editor showing you they are not visible at the current moment. Move the playhead into their range and they render fully.
No — grouping is image-editor only. In the video editor, shift-click or drag a marquee to multi-select clips and move, nudge, or delete them together.
The editor timeline (5–300 seconds) is a design-time preview length. At export, clip timing is resolved against each actual video using the anchor rules.